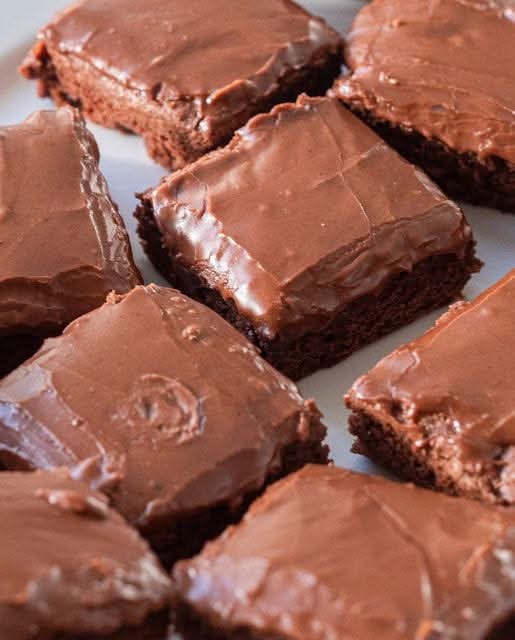
If you grew up in the 1970s or 1980s, you probably remember the brownies from your school cafeteria. Thick, fudgy, and topped with a glossy, crackly chocolate icing poured on while still warm — they were the stuff of legend. This
Lunchroom Ladies Brownies recipe brings that vintage magic back to your own kitchen.
These brownies are rich, dense, and deeply chocolatey, with a thick, fudgy texture that’s more like a truffle than a cake. Then they’re topped with a smooth, glossy chocolate icing that sets into a crackly shell — the signature finish of those beloved school cafeteria brownies.
Prep takes 15 minutes, they bake in 25 minutes, and the recipe makes 24 bars. Perfect for potlucks, bake sales, family gatherings, or anytime you want a nostalgic treat that everyone will love.
Recipe Card
Lunchroom Ladies Brownies 🍫
The legendary, vintage school cafeteria brownies! Fudgy, thick chocolate brownies topped with a rich, glossy, crackly chocolate icing poured on while still warm.
Prep Time: 15 minutes |
Cook Time: 25 minutes |
Total Time: 40 minutes
Servings: 24 bars
For the brownies
- 1 cup butter, melted
- 2 cups granulated sugar
- 4 large eggs
- 4 teaspoons vanilla extract
- ½ cup unsweetened cocoa powder
- 2 cups all-purpose flour
For the icing
- ¼ cup softened butter
- ¼ cup milk (whole milk works best)
- ¼ cup unsweetened cocoa powder
- 3 cups powdered sugar
Instructions
- Prep the Pan: Preheat the oven to 350°F. Spray a 9×13-inch baking dish with nonstick spray and line it with a parchment paper or foil sling, leaving an overhang on the sides.
- Mix Wet Ingredients: In a large mixing bowl, cream together your melted butter and granulated sugar. Add the eggs and vanilla extract, and mix well until completely smooth.
- Add Dry Ingredients: Add your dry ingredients (cocoa powder and flour) and stir until just combined. Do not overmix. The batter will be very thick.
- Bake: Pour the thick batter into the prepared pan and smooth it out as best as you can. Bake for 20–25 minutes until a toothpick inserted into the center comes out clean. Err on the side of underbaking if you are questioning it.
- Rest: Remove from the oven and let the hot brownies sit in the pan for exactly 15 minutes. You want them to still be quite warm when you pour on the icing.
- Make the Icing: Once you remove the brownies from the oven, make your icing by mixing the softened butter, milk, cocoa powder, and powdered sugar together in a bowl until perfectly smooth.
- Ice and Cool: Pour the smooth icing evenly over the top of the still very warm brownies. Let them cool completely before lifting them out of the pan to serve.
Why This Recipe Works
The melted butter and sugar create a rich, fudgy base. Melted butter doesn’t trap as much air as softened butter, which means these brownies bake up dense and fudgy rather than cakey.
The four eggs add richness and structure. Four eggs give the brownies their dense, chewy texture and help them hold together when sliced.
The vanilla extract enhances the chocolate flavor. A generous four teaspoons of vanilla adds warmth and depth to the brownies, making the chocolate taste richer and more complex.
The cocoa powder and flour create the perfect brownie texture. Unsweetened cocoa powder brings deep, rich chocolate flavor, while the flour provides just enough structure to hold everything together.
The thick batter bakes into a dense, fudgy brownie. Don’t let the thickness of the batter concern you — it’s exactly what gives these brownies their signature texture.
Underbaking slightly keeps the brownies fudgy. Err on the side of underbaking rather than overbaking. The brownies will continue to set as they cool.
The icing is poured over the warm brownies. This is the secret to that glossy, crackly finish. The warmth of the brownies helps the icing spread evenly and set into a beautiful, shiny shell.
Letting the brownies cool completely before cutting ensures clean slices. Patience here is rewarded with neat, picture-perfect bars.
Pro Tips for Perfect Results Every Time
Use melted butter, not softened. Melted butter creates a denser, fudgier brownie. Softened butter will make them cakier.
Mix the butter and sugar until smooth. Make sure the sugar is fully incorporated into the melted butter before adding the eggs.
Add the eggs one at a time. Adding them one at a time ensures they’re fully incorporated and the batter is smooth.
Add the dry ingredients and stir just until combined. Overmixing develops gluten and makes the brownies tough. Stop as soon as the flour disappears.
Spread the batter evenly in the pan. The batter is thick, so use a spatula to spread it into an even layer.
Bake until a toothpick comes out clean. This takes about 20–25 minutes. Err on the side of underbaking rather than overbaking.
Let the brownies rest for exactly 15 minutes. This is the sweet spot — long enough for the brownies to set slightly, but short enough that they’re still warm when the icing goes on.
Make the icing while the brownies rest. This saves time and ensures the icing is ready to pour when the brownies come out of the oven.
Mix the icing until perfectly smooth. Make sure the butter, milk, cocoa powder, and powdered sugar are fully combined and the icing is smooth and glossy.
Pour the icing over the still-warm brownies. The warmth of the brownies helps the icing spread evenly and set into a glossy, crackly shell.
Let the brownies cool completely before cutting. This ensures the icing sets and the brownies hold their shape when sliced.
Use a sharp knife and wipe it between cuts. A sharp knife and a clean blade give you neat, picture-perfect bars.
Variations and Substitutions
Add chocolate chips. A cup of semisweet chocolate chips stirred into the batter adds pockets of melted chocolate.
Add nuts. Chopped walnuts or pecans stirred into the batter add crunch and flavor.
Make it a mint chocolate version. Add a teaspoon of peppermint extract to the icing for a mint chocolate twist.
Make it a coffee version. Add a teaspoon of espresso powder to the batter for a richer, more intense chocolate flavor.
Make it a salted version. Sprinkle flaky sea salt over the icing before it sets for a sweet-salty contrast.
Make it a caramel version. Drizzle caramel sauce over the icing before it sets for a sweet, buttery finish.
Make it gluten-free. Use a 1-to-1 gluten-free all-purpose flour blend in place of the regular flour, and verify that all other ingredients are gluten-free.
Make it dairy-free. Use dairy-free butter and dairy-free milk in both the brownies and the icing.
Make it a double batch. Double the recipe and bake in two 9×13-inch pans for a crowd.
Make it a smaller batch. Halve the recipe and bake in an 8×8-inch pan. Adjust the bake time as needed.
Storage and Reheating
Room temperature: Store the cooled brownies in an airtight container at room temperature for up to 3 days. The icing will stay glossy and the brownies will stay fudgy.
Refrigerator: For longer storage, keep the brownies in an airtight container in the refrigerator for up to 1 week. Bring to room temperature before serving.
Freezer: These brownies freeze beautifully. Cut them into bars, wrap each one tightly in plastic wrap and foil, and freeze for up to 3 months. Thaw at room temperature before serving.
Make ahead: These brownies are ideal for making ahead. Prepare them up to 3 days in advance and store them in an airtight container at room temperature.
No reheating needed: These brownies are best at room temperature. If you prefer them warm, a quick 10–15 seconds in the microwave brings back that fresh-baked softness.
Food safety: Since these brownies contain eggs, butter, and dairy, don’t leave them at room temperature for more than 2 hours. Store in an airtight container.
What to Serve With Them
These brownies are delicious on their own, but a few accompaniments take them to the next level:
- A cold glass of milk — the classic pairing
- A cup of hot coffee or tea
- A scoop of vanilla ice cream for an indulgent dessert
- A drizzle of chocolate or caramel sauce
- A sprinkle of flaky sea salt for a sweet-salty finish
- Fresh berries for a tart contrast
Frequently Asked Questions
Can I use a different type of cocoa powder?
Yes. Dutch-process cocoa powder works beautifully and adds a deeper, richer chocolate flavor.
Why did my brownies turn out cakey?
They were overbaked, or the batter was overmixed. Bake just until a toothpick comes out clean, and stir the dry ingredients in just until combined.
Why did my icing turn out too thin?
The icing needs more powdered sugar. Add a tablespoon at a time until it reaches a spreadable consistency.
Why did my icing turn out too thick?
The icing needs more milk. Add a teaspoon at a time until it reaches a spreadable consistency.
Can I make these ahead of time?
Yes. Prepare them up to 3 days in advance and store them in an airtight container at room temperature.
Can I freeze these brownies?
Yes, for up to 3 months. Cut them into bars, wrap each one tightly in plastic wrap and foil, and freeze. Thaw at room temperature before serving.
Can I add chocolate chips or nuts?
Yes. A cup of semisweet chocolate chips or chopped walnuts or pecans stirred into the batter adds flavor and texture.
Can I make these gluten-free?
Yes. Use a 1-to-1 gluten-free all-purpose flour blend in place of the regular flour, and verify that all other ingredients are gluten-free.
Can I make these dairy-free?
Yes. Use dairy-free butter and dairy-free milk in both the brownies and the icing.
Can I make these in a different pan size?
Yes. Use an 8×8-inch pan for thicker brownies and adjust the bake time as needed. Use a larger pan for thinner brownies.
How long do these last?
Up to 3 days at room temperature in an airtight container, or up to 1 week in the refrigerator.
Can I double this recipe?
Yes. Use two 9×13-inch pans and divide the batter evenly. Bake both, rotating them halfway through if needed.
Final Thoughts
These
Lunchroom Ladies Brownies are everything a vintage, nostalgic dessert should be: rich, fudgy, and topped with a glossy, crackly chocolate icing that makes every bite feel special. They’re the kind of brownie that brings back memories of school cafeterias and bake sales, and they’re just as delicious today as they were back then.
They’re perfect for potlucks, bake sales, family gatherings, or anytime you want a nostalgic treat that everyone will love. And because they’re easy to make and store beautifully, they’re the kind of recipe you’ll come back to again and again.
If you make these brownies, I’d love to hear how they turned out. Did you add chocolate chips? Sprinkle on flaky sea salt? Try a mint chocolate version? Drop a comment below and let me know — and if you’re planning to make them, save this recipe for your next nostalgic baking day.