
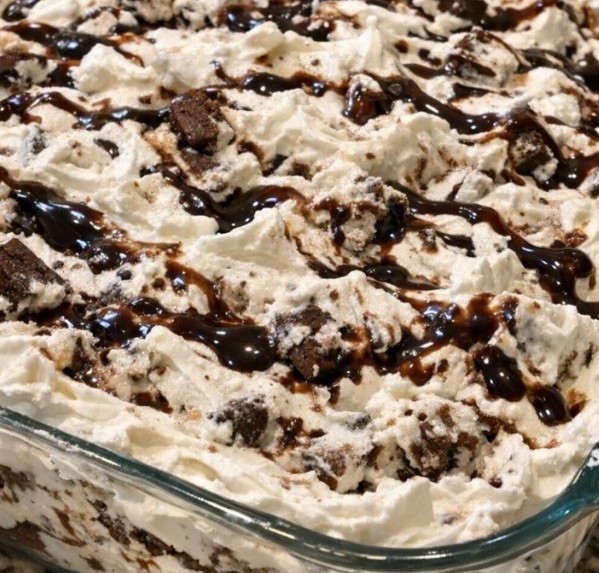
Some desserts are just pure summer joy — and this Ice Cream Sandwich Cake is one of them. Layers of vanilla ice cream sandwiches, a marbled chocolate whipped topping, and a drizzle of chocolate syrup come together into a cool, creamy, no-bake cake that’s as easy to make as it is to eat.
It’s the kind of dessert that shows up at birthday parties, cookouts, potlucks, and family gatherings and disappears before you can set it down. And because there’s no baking involved, it’s perfect for hot days when you don’t want to turn on the oven.
Prep takes about 20 minutes, it freezes for at least 4 hours, and it serves 12. Perfect for a crowd-pleasing dessert with minimal effort.
Recipe Card
Ice Cream Sandwich Cake 🍦
Layers of vanilla ice cream sandwiches, marbled chocolate whipped topping, and a chocolate drizzle — a cool, creamy, no-bake dessert that’s always a hit.
Servings: 12
Ingredients
- 24 rectangular vanilla ice cream sandwiches (standard size, unwrapped)
- 12 ounces frozen whipped topping, thawed (about 1½ standard tubs)
- ¾ cup chocolate syrup, plus extra for drizzling on top
- ¼ teaspoon kosher salt (optional, to balance sweetness)
- Nonstick cooking spray or a thin swipe of neutral oil for the dish
Directions
- Lightly coat a 9×13-inch glass baking dish with nonstick cooking spray or a very thin film of neutral oil. This keeps the cake from sticking while still letting it cling just enough to hold its shape.
- In a medium bowl, gently fold together 8 ounces (about 1 tub) of the thawed whipped topping, ½ cup of the chocolate syrup, and the kosher salt, if using. Stir just until mostly blended but still a little streaky; you want a soft, marbled look rather than a perfectly uniform chocolate color.
- Unwrap 12 of the ice cream sandwiches and arrange them in a single snug layer in the bottom of the prepared dish. You may need to cut a sandwich in half to fill any gaps; fit them in like tiles so the base is mostly covered.
- Spoon the chocolatey whipped topping mixture over the first layer of sandwiches. Use an offset spatula or the back of a spoon to spread it into an even layer, pressing gently so it settles into the gaps between the sandwiches. Don’t worry if the surface looks a bit uneven—that homemade, slightly lumpy texture is exactly what you want.
- Unwrap the remaining 12 ice cream sandwiches and arrange them on top of the whipped layer, creating a second layer. Again, trim a sandwich if needed so the top is mostly covered from edge to edge.
- Spread the remaining 4 ounces (about half a tub) of plain whipped topping over the top layer of sandwiches. Aim for a thick, fluffy coat about ½ inch deep. Use the tip of your spatula or a spoon to create loose swirls and peaks so the top looks casually textured rather than perfectly smooth.
- Drizzle the remaining ¼ cup chocolate syrup over the top in a zigzag or circular pattern. Lightly drag the tip of a knife or skewer through the syrup and whipped topping to create a messy, marbled effect. The surface should look swirled and a little imperfect, with some thicker patches and some thinner ones.
- Cover the dish tightly with plastic wrap or foil, making sure it doesn’t touch the surface of the whipped topping too much, and freeze for at least 4 hours, or until completely firm. For the cleanest slices, freeze overnight.
- When ready to serve, remove the cake from the freezer and let it sit at room temperature for 5–10 minutes, just until a sharp knife can glide through. Cut into squares, wiping the knife between cuts if you want neater pieces, and serve directly from the glass dish with extra chocolate syrup on the side.
Why This Recipe Works
Ice cream sandwiches are the perfect shortcut base. They’re already layered with ice cream and wafer cookies, so they create a built-in cake structure with minimal effort.
The whipped topping creates a creamy, fluffy layer. It binds the layers together and adds a light, airy texture that contrasts beautifully with the dense ice cream sandwiches.
The chocolate syrup adds richness and a beautiful marbled look. Folding it into the whipped topping creates a soft, marbled effect, and drizzling it over the top adds a glossy, decadent finish.
The kosher salt balances the sweetness. A small pinch of salt enhances the chocolate flavor and keeps the cake from being cloyingly sweet.
Freezing for at least 4 hours allows the cake to set firmly. This makes it easy to slice and gives it that classic ice cream cake texture.
Letting the cake sit at room temperature for 5–10 minutes before slicing makes cutting easier. A sharp knife glides through more easily, and wiping it between cuts gives you neat, picture-perfect slices.
Pro Tips for Perfect Results Every Time
Use a glass baking dish. A glass dish looks beautiful when serving and helps the cake hold its shape.
Lightly grease the dish. A thin coating of cooking spray or oil prevents the cake from sticking and makes it easier to slice and serve.
Arrange the sandwiches snugly in a single layer. Fit them in like tiles so the base is mostly covered. Cut a sandwich in half to fill any gaps.
Fold the whipped topping and chocolate syrup gently. Stir just until mostly blended but still a little streaky for that marbled look.
Spread the whipped topping evenly. Press gently so it settles into the gaps between the sandwiches.
Create loose swirls and peaks on top. A casually textured top looks homemade and inviting.
Drizzle the chocolate syrup in a zigzag or circular pattern. Drag a knife or skewer through it for a marbled effect.
Cover tightly and freeze for at least 4 hours. For the cleanest slices, freeze overnight.
Let the cake sit at room temperature for 5–10 minutes before slicing. A sharp knife glides through more easily.
Wipe the knife between cuts. This gives you neat, picture-perfect slices.
Serve with extra chocolate syrup on the side. The more chocolate, the better.
Store leftovers in the freezer. The cake stays fresh and firm for up to 2 weeks.
Variations and Substitutions
Use a different ice cream sandwich flavor. Chocolate, strawberry, or Neapolitan ice cream sandwiches all work beautifully.
Use a different syrup. Caramel syrup, strawberry syrup, or hot fudge sauce all work beautifully in place of chocolate syrup.
Add crushed cookies. Crushed Oreos, chocolate chip cookies, or graham crackers sprinkled between the layers add crunch and flavor.
Add fresh fruit. Sliced strawberries or bananas layered between the sandwiches add a fresh, fruity twist.
Add nuts. Chopped pecans, walnuts, or peanuts sprinkled over the top add crunch and flavor.
Make it a s’mores version. Use chocolate ice cream sandwiches, drizzle with chocolate syrup, and sprinkle crushed graham crackers and mini marshmallows over the top.
Make it a peanut butter version. Drizzle peanut butter over the top along with the chocolate syrup.
Make it gluten-free. Use gluten-free ice cream sandwiches in place of the regular ones.
Make it dairy-free. Use dairy-free ice cream sandwiches and dairy-free whipped topping.
Make it a larger batch. Double the recipe and use two baking dishes. Adjust the freezing time as needed.
Storage and Reheating
Freezer: Store the cake tightly covered in the freezer for up to 2 weeks. For best results, wrap it in plastic wrap and then foil to prevent freezer burn.
Refrigerator: This cake is not meant to be stored in the refrigerator. It will melt quickly at refrigerator temperatures.
Reheating: This cake is served frozen or slightly softened. Never heat it — it will melt.
Make ahead: This cake is ideal for making ahead. Prepare it up to 2 weeks in advance and store it in the freezer.
Serving leftovers: Remove the cake from the freezer and let it sit at room temperature for 5–10 minutes before slicing. Serve immediately.
Food safety: Since this cake contains dairy, keep it frozen and don’t leave it at room temperature for more than 15 minutes.
What to Serve With It
This cake is delicious on its own, but a few accompaniments take it to the next level:
- Extra chocolate syrup for drizzling
- A dollop of whipped cream for extra indulgence
- Fresh berries for a tart contrast
- A sprinkle of sea salt for a sweet-salty finish
- A cup of hot coffee or tea for an afternoon treat
- A glass of cold milk
Frequently Asked Questions
Can I use a different ice cream sandwich flavor? Yes. Chocolate, strawberry, or Neapolitan ice cream sandwiches all work beautifully.
Can I use a different syrup? Yes. Caramel syrup, strawberry syrup, or hot fudge sauce all work beautifully in place of chocolate syrup.
Why did my cake turn out too soft? It didn’t freeze long enough. Freeze for at least 4 hours, or overnight for the firmest cake.
Why did my cake turn out too hard? It froze too long, or it was served straight from the freezer. Let it sit at room temperature for 5–10 minutes before slicing.
Can I add crushed cookies or nuts? Yes. Crushed Oreos, chocolate chip cookies, graham crackers, or chopped nuts all add crunch and flavor.
Can I make this ahead of time? Yes. Prepare the cake up to 2 weeks in advance and store it in the freezer.
Can I freeze this cake? Yes, for up to 2 weeks. Wrap it tightly in plastic wrap and foil to prevent freezer burn.
Can I make this gluten-free? Yes. Use gluten-free ice cream sandwiches in place of the regular ones.
Can I make this dairy-free? Yes. Use dairy-free ice cream sandwiches and dairy-free whipped topping.
How long does this last in the freezer? Up to 2 weeks, tightly wrapped.
Can I double this recipe? Yes. Double the ingredients and use two baking dishes. Adjust the freezing time as needed.
What’s the best way to slice it? Let the cake sit at room temperature for 5–10 minutes, then use a sharp knife and wipe it between cuts for neat, picture-perfect slices.
Final Thoughts
This Ice Cream Sandwich Cake is everything a no-bake dessert should be: cool, creamy, chocolatey, and completely irresistible. It comes together with just a few simple ingredients and minimal effort, and it’s always a crowd-pleaser.
It’s perfect for birthday parties, cookouts, potlucks, or anytime you need a crowd-pleasing dessert that doesn’t require turning on the oven. Serve it with extra chocolate syrup on the side, and watch it disappear.
If you make this cake, I’d love to hear how it turned out. Did you use a different ice cream sandwich flavor? Add crushed cookies or nuts? Try a s’mores version? Drop a comment below and let me know — and if you’re planning to make it, save this recipe for your next gathering.