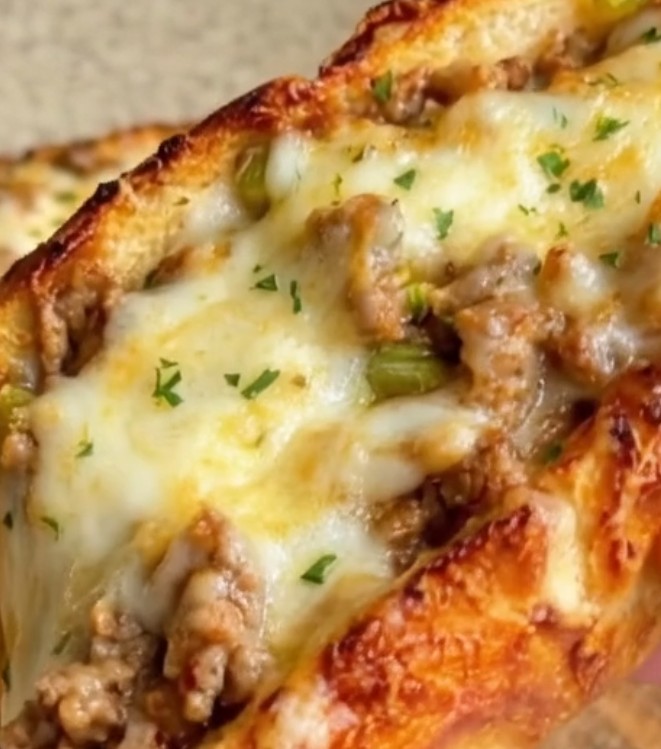
Some recipes are just plain fun to make. These
Cheesy Beef Hot Dog Buns are one of them. Soft, homemade buns get wrapped around a savory ground beef filling and plenty of melted cheese — and the result is a handheld, crowd-pleasing treat that’s perfect for lunch, dinner, or a party.
They’re a cross between a stuffed bun and a handheld cheeseburger, with a soft, fluffy dough, a seasoned beef filling, and a gooey cheese center. And because they’re made from scratch, they taste fresher and more satisfying than anything you can buy.
Prep takes about 30 minutes plus rising time, they bake in about 20 minutes, and the recipe makes 8 buns. Perfect for a weekend baking project, a fun family dinner, or a party appetizer.
Recipe Card
Cheesy Beef Hot Dog Buns
Soft homemade buns filled with savory beef and melted cheese — a fun, handheld treat for lunch, dinner, or a party.
Prep: 30 minutes plus rising time |
Bake: About 20 minutes
Makes: 8 buns
For the dough
- 3 cups (375 g) all-purpose flour, plus extra for kneading
- 2¼ teaspoons (7 g) instant yeast
- 2 tablespoons granulated sugar
- 1 teaspoon salt
- ¾ cup (180 ml) warm milk
- 1 large egg
- 3 tablespoons unsalted butter, softened
For the beef filling
- 1 pound (450 g) ground beef
- 1 small onion, finely chopped
- 2 cloves garlic, minced
- 1 tablespoon cooking oil
- 1 teaspoon paprika
- ½ teaspoon black pepper
- ½ teaspoon salt, or to taste
- 1 tablespoon ketchup
- 1 teaspoon mustard
- 1 tablespoon Worcestershire sauce, optional
For the cheese filling
- 1½ cups (approximately 170 g) shredded cheddar cheese
- ½ cup (approximately 55 g) shredded mozzarella cheese
For the topping
- 1 egg, beaten
- 1 tablespoon milk
- 1 tablespoon sesame seeds, optional
- 1 tablespoon melted butter, optional, for brushing after baking
Instructions
- Prepare the dough: Combine the flour, instant yeast, sugar, and salt in a large mixing bowl. Add the warm milk and egg, and mix until a rough dough forms. Add the softened butter and knead for 8–10 minutes by hand, or 5–7 minutes using a stand mixer fitted with a dough hook, until smooth, elastic, and slightly tacky. Shape into a ball, place in a lightly greased bowl, cover, and let rise in a warm place for 60–90 minutes, until doubled in size.
- Cook the beef filling: Heat the oil in a large skillet over medium heat. Add the onion and cook for 3–4 minutes, until softened. Add the garlic and cook for 30 seconds. Add the ground beef and cook until browned, breaking it into small pieces. Drain excess fat. Season with paprika, black pepper, and salt. Stir in the ketchup, mustard, and Worcestershire sauce, if using. Cook for another 2–3 minutes, then remove from heat and let cool.
- Prepare the cheese: Mix the shredded cheddar and mozzarella together in a bowl.
- Divide and shape the dough: Once the dough has doubled, gently press it down. Transfer to a lightly floured surface and divide into eight equal portions. Shape each portion into a ball. Using a rolling pin, flatten each ball into an oval about 5–6 inches long. Keep the unused dough covered with a clean towel while working.
- Fill and seal: Spoon some beef filling and a handful of cheese onto the center of each oval. Fold the dough over the filling and pinch the edges to seal.
- Bake: Place the buns seam-side down on a parchment-lined baking sheet. Brush with the beaten egg and milk mixture and sprinkle with sesame seeds, if using. Bake at 375°F (190°C) for about 20 minutes, until golden brown.
- Finish and serve: Brush the warm buns with melted butter, if desired, and serve warm.
Why This Recipe Works
The homemade dough is soft, fluffy, and slightly sweet. The combination of flour, yeast, sugar, salt, warm milk, egg, and butter creates a soft, tender dough that’s easy to work with and bakes into a fluffy, golden bun.
The warm milk activates the yeast without damaging it. Warm milk (not hot) provides the ideal environment for the yeast to activate and the dough to rise.
Kneading develops the gluten and creates a smooth, elastic dough. Kneading for 8–10 minutes by hand or 5–7 minutes in a stand mixer develops the gluten, which gives the buns their structure and chewy texture.
The beef filling is savory, seasoned, and slightly tangy. Ground beef, onion, garlic, paprika, ketchup, mustard, and Worcestershire sauce come together to create a rich, flavorful filling that pairs beautifully with the soft dough and melted cheese.
Cooling the beef before assembling prevents the cheese from melting prematurely. Cooled filling is easier to handle and keeps the cheese from melting before the buns even go into the oven.
The cheddar and mozzarella blend creates the perfect cheese center. Cheddar adds a sharp, tangy flavor, while mozzarella adds stretchiness. Together, they create a gooey, melty center that’s absolutely irresistible.
The egg wash and sesame seeds create a golden, bakery-style finish. Brushing the buns with an egg wash gives them a beautiful golden color, while sesame seeds add a subtle crunch and visual appeal.
Pro Tips for Perfect Results Every Time
Use warm milk, not hot. The milk should be warm to the touch, about 110°F (43°C). Hot milk can kill the yeast and prevent the dough from rising.
Knead the dough until it’s smooth and elastic. This takes about 8–10 minutes by hand or 5–7 minutes in a stand mixer. The dough should be slightly tacky but not sticky.
Add flour a tablespoon at a time if the dough is too sticky. Avoid adding too much flour, which can make the buns dense.
Let the dough rise in a warm place until doubled in size. This takes about 60–90 minutes, depending on the temperature of your kitchen.
Cook the beef filling while the dough rises. This saves time and ensures the filling is ready when the dough is.
Drain the excess fat from the beef. Excess grease can make the dough soggy and cause the buns to open during baking.
Cool the beef filling completely before assembling. Hot filling can melt the cheese prematurely and make the dough difficult to handle.
Roll the dough ovals thick enough to hold the filling without tearing. About 5–6 inches long and thick enough to wrap around the filling comfortably.
Don’t overfill the buns. A spoonful of beef and a handful of cheese is the sweet spot. Overfilling makes the buns difficult to seal and prone to leaking.
Pinch the edges firmly to seal the buns. A tight seal prevents the filling from leaking out during baking.
Place the buns seam-side down on the baking sheet. This keeps the seam against the pan and prevents the buns from opening during baking.
Brush with egg wash for a golden finish. The egg wash gives the buns a beautiful golden color and helps the sesame seeds adhere.
Bake until golden brown. The buns should be golden and cooked through, about 20 minutes.
Brush with melted butter after baking for a glossy finish. It’s optional, but it adds a rich, buttery flavor and a beautiful shine.
Variations and Substitutions
Use a different protein. Ground turkey, chicken, or sausage all work beautifully in place of the ground beef.
Use a different cheese. Monterey Jack, Colby, pepper jack, or a Mexican blend all melt beautifully. Pepper jack adds heat.
Make it spicier. Add red pepper flakes, diced jalapeños, or a pinch of cayenne to the beef filling.
Add vegetables. Diced bell peppers, mushrooms, or spinach can be added to the beef filling.
Make it a breakfast version. Use scrambled eggs and breakfast sausage in place of the beef filling.
Make it a pizza version. Use pizza sauce, mozzarella, and pepperoni in place of the beef filling.
Make it gluten-free. Use a 1-to-1 gluten-free all-purpose flour blend in place of the regular flour, and verify that all other ingredients are gluten-free.
Make it dairy-free. Use dairy-free butter, dairy-free milk, and dairy-free cheese alternatives.
Make it a mini version. Divide the dough into 16 smaller portions for bite-sized buns. Reduce the bake time to 15–18 minutes.
Make it a freezer-friendly version. Freeze the baked buns individually wrapped for up to 3 months, then reheat in the oven.
Storage and Reheating
Refrigerator: Store cooled buns in an airtight container in the refrigerator for up to 3 days.
Reheating: The best way to reheat is in a 350°F (175°C) oven for 10–12 minutes, until warm and crispy. You can also reheat in the microwave for 30–45 seconds.
Freezer: These buns freeze beautifully. Wrap each bun tightly in plastic wrap and foil, and freeze for up to 3 months. Reheat from frozen in a 350°F (175°C) oven for 15–20 minutes.
Make ahead: You can prepare the dough and filling up to 24 hours in advance and store them separately in the refrigerator. Assemble and bake the buns just before serving.
Food safety: Since these buns contain meat and dairy, don’t leave them at room temperature for more than 2 hours. Refrigerate leftovers promptly.
What to Serve With Them
These buns are a complete meal on their own, but a few sides round them out beautifully:
- A crisp green salad with a tangy vinaigrette
- French fries or sweet potato fries
- Coleslaw for a cool, crunchy contrast
- Pickles or pickled vegetables
- A cup of tomato soup for dipping
- A cold beer or soda for the ultimate pairing
Frequently Asked Questions
Can I use a different protein?
Yes. Ground turkey, chicken, or sausage all work beautifully in place of the ground beef.
Can I use a different cheese?
Yes. Monterey Jack, Colby, pepper jack, or a Mexican blend all melt beautifully. Pepper jack adds heat.
Why did my dough not rise?
The milk was too hot, the yeast was expired, or the room was too cold. Use warm milk, fresh yeast, and let the dough rise in a warm place.
Why did my buns open during baking?
The edges weren’t sealed tightly enough, or the filling was too wet. Pinch the edges firmly and drain the beef well.
Can I make these ahead of time?
You can prepare the dough and filling up to 24 hours in advance and store them separately in the refrigerator. Assemble and bake the buns just before serving.
Can I freeze these buns?
Yes, for up to 3 months. Wrap each bun tightly in plastic wrap and foil, and freeze. Reheat in a 350°F (175°C) oven for 15–20 minutes.
Can I make these gluten-free?
Yes. Use a 1-to-1 gluten-free all-purpose flour blend in place of the regular flour, and verify that all other ingredients are gluten-free.
Can I make these dairy-free?
Yes. Use dairy-free butter, dairy-free milk, and dairy-free cheese alternatives.
Can I make these mini?
Yes. Divide the dough into 16 smaller portions for bite-sized buns. Reduce the bake time to 15–18 minutes.
Can I add vegetables to the filling?
Yes. Diced bell peppers, mushrooms, or spinach can be added to the beef filling.
How long do these last in the refrigerator?
Up to 3 days in an airtight container. Reheat in the oven for the best texture.
Can I double this recipe?
Yes. Double all the ingredients and bake on two baking sheets. Rotate the sheets halfway through baking.
Final Thoughts
These
Cheesy Beef Hot Dog Buns are everything a homemade treat should be: soft, fluffy, savory, and packed with melted cheese. The homemade dough is tender and golden, the beef filling is rich and flavorful, and the cheese center is gooey and irresistible.
They’re perfect for a weekend baking project, a fun family dinner, or a party appetizer. And because they freeze beautifully, you can make a batch and have them ready whenever a craving strikes.
If you make these buns, I’d love to hear how they turned out. Did you use a different protein? Add vegetables? Make them spicy? Drop a comment below and let me know — and if you’re planning to make them, save this recipe for your next baking day.