There’s a particular kind of magic that happens when four humble ingredients—flour, water, yeast, and salt—are given time, combined with the intense heat of a cast-iron pot. The result is The Best Crusty Bread: a loaf with a shatteringly crisp, crackly exterior that gives way to a soft, chewy, and hole-riddled interior. This isn’t just baking; it’s a transformation. Based on a celebrated no-knead method, this recipe demystifies the art of artisan bread, proving that with a little patience and the right technique, anyone can pull a bakery-quality loaf from their home oven. The secret weapon? Your trusty Dutch oven.
The Soul of the Bread: Understanding the No-Knead Method
Before we begin, it’s crucial to understand why this recipe works so brilliantly. Traditional bread-making involves significant kneading to develop gluten, the protein network that gives bread its structure. The no-knead method takes a different, more patient path.
By using a very wet dough and allowing it to ferment for an extended period (12 to 24 hours), natural enzymes and the slow-acting yeast work to develop the gluten for you. This long, cold fermentation is the heart of the process. It does more than just raise the dough; it develops deep, complex flavors often associated with sourdough, creates those desirable irregular air pockets (the “open crumb”), and results in an incredibly moist interior. The final key is the Dutch oven, which acts as a miniature steam-injected oven. The sealed environment traps moisture from the dough as it bakes, creating the ideal conditions for “oven spring” (the final burst of rising) and that legendary, blistered crust.
Gathering Your Tools and Ingredients
Success in baking starts with preparation. For this recipe, you don’t need many tools, but the ones you do need are specific.
Essential Equipment:
-
A 3 to 4-Quart Dutch Oven with a Tight-Fitting Lid: This is non-negotiable. The heavy cast iron retains and distributes heat perfectly, while the lid traps the crucial steam. Ensure yours is rated for very high heat (450°F+).
-
A Large Mixing Bowl with a Lid or Plastic Wrap: The bowl must be large enough for the dough to roughly double in size during its long rest.
-
A Wooden Spoon or Sturdy Spatula:For mixing the shaggy dough.
-
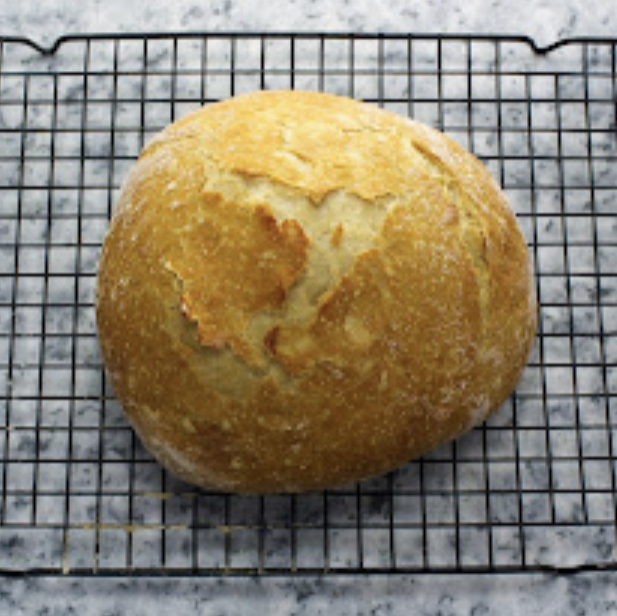
A Wire Cooling Rack: Essential for letting the bread cool properly and preventing a soggy bottom.
The Simple Ingredients:
-
3 cups (about 400g) Bread Flour:While all-purpose flour can work in a pinch, bread flour is highly recommended. Its higher protein content (usually 12-13% vs. 10-11% in AP flour) creates stronger gluten strands, leading to a taller, chewier loaf with a better structure.
-
1 ½ teaspoons Salt: Fine sea salt or kosher salt works best. Do not reduce the salt; it controls yeast activity and is vital for flavor.
-
1 teaspoon Active Dry Yeast: Just one teaspoon is all you need for this slow-rising dough.
-
1 ½ cups (350ml) Warm Water: The water should be warm to the touch, about 105-115°F (40-46°C). Too hot will kill the yeast; too cold will slow it down excessively.
The Step-by-Step Process: Patience Makes Perfect
Day 1: The Mix and The Long Rest (5 Minutes Active Time)
-
Combine Dry Ingredients: In your large mixing bowl, whisk together the bread flour, salt, and yeast until evenly distributed.
-
Add Water and Mix: Pour in the warm water. Use your wooden spoon or spatula to stir until you have a wet, shaggy, and sticky dough. There should be no dry patches of flour left. Do not be tempted to add more flour; the high hydration is key.
-
Cover and Rest: Place the lid on the bowl or cover it tightly with plastic wrap. Let it sit at room temperature (ideally 70-72°F or 21-22°C) for 12 to 18 hours. You can go up to 24 hours for a more pronounced, tangy flavor. The dough is ready when its surface is dotted with bubbles and it has risen significantly.
Day 2: The Bake (About 1 Hour Total)
-
Preheat with Purpose: At least 30 minutes before you plan to bake, place your empty Dutch oven (with its lid on) into your oven. Preheat the oven to 450°F (230°C). The pot needs this full half-hour to become screaming hot, which is critical for oven spring.
-
Shape with Care (But Don’t Knead!):While the pot heats, generously flour a work surface or a piece of parchment paper. The dough will be very loose and bubbly. Using a bowl scraper or floured hands, gently scrape the dough out onto the flour. With floured hands, gently fold the edges of the dough into the center a few times to form a rough ball. This is not kneading; you are just creating surface tension. Let it sit seam-side down while the pot finishes heating.
-
Bake for the Perfect Crust:
-
Carefully remove the scorching hot Dutch oven from your oven and take off the lid.
-
Gently lift your dough ball and place it into the center of the pot. It’s okay if it’s lopsided; it will even out as it bakes. Replace the lid immediately.
-
Return the pot to the oven and bake covered for 30 minutes. This steams the loaf.
-
After 30 minutes, remove the lid. You will be greeted by a pale, puffed-up loaf. Bake for another 10 to 15 minutes, uncovered, until the crust is a deep, glorious golden brown.
-
-
The Most Important Final Step – Cool:Using oven mitts, carefully lift the bread from the pot (a spatula can help) and transfer it to a wire cooling rack. You must let the bread cool for at least one hour, ideally two, before cutting. Cutting too soon releases steam from the interior, leaving you with a gummy crumb. The aroma will test your willpower, but patience is rewarded with perfect texture.
Expert Tips for Consistent Success
-
Flour Matters: For the chewiest, most authentic texture, stick with bread flour. It makes a noticeable difference.
-
Temperature is a Lever: A warmer room will accelerate fermentation (closer to 12 hours), while a cooler spot will slow it down (up to 24 hours). You can use this to schedule your bake around your day.
-
Listen to the Bread: The loaf is done when it has a rich brown color and sounds hollow when you tap the bottom.
-
Customize Your Loaf: This is a perfect base recipe. After the initial mix, try folding in a handful of chopped fresh rosemary, kalamata olives, or sundried tomatoes. For a seeded crust, roll the shaped dough ball in a mix of sesame, flax, and poppy seeds before placing it in the hot pot.
Conclusion: The Joy of Homemade Bread
This Dutch Oven Crusty Bread recipe is more than just a set of instructions; it’s an invitation to experience the profound satisfaction of creating something truly fundamental. It connects us to a timeless culinary tradition while utilizing a brilliantly simple modern technique. The process teaches patience, and the result—a stunning, fragrant, crackling loaf—rewards it tenfold. Whether you tear it apart to dip in your finest olive oil, use it to mop up a stew, or simply slather it with butter, this bread transforms a simple meal into an occasion. So, clear your schedule for tomorrow, mix your dough tonight, and prepare to fill your kitchen with the unforgettable scent and triumphant result of homemade artisan bread.